CKAD exam Preparation Notes - Pods, Deployments, ReplicaSets and Namespaces- Part 1
Table of contents
After passing the CKA exam last year, I was not getting time to go for the CKAD. But now, I have started preparing for the same, and while doing the preparation, I'm creating notes in the series of blogs. Before starting the preparation, it's highly recommended to go for the following resources so that you will get some understanding about the exam.
CKAD Curriculum: https://github.com/cncf/curriculum/blob/master/CKAD_Curriculum_v1.24.pdf
Exam Tips: https://docs.linuxfoundation.org/tc-docs/certification/tips-cka-and-ckad
Candidate Handbook: https://www.cncf.io/certification/candidate-handbook
Certified Kubernetes Application Developer: http://kub.to/dev
Architecture
Kubernetes is a tool, and you can also call it a cluster that manages the container's run-time and ensures its resiliency and maximum usage of the underline hardware. It also ensures that all the containers are healthy and replace the unhealthy container with a new one. While managing the container, Kubernetes also provides the load management of its servers or nodes.
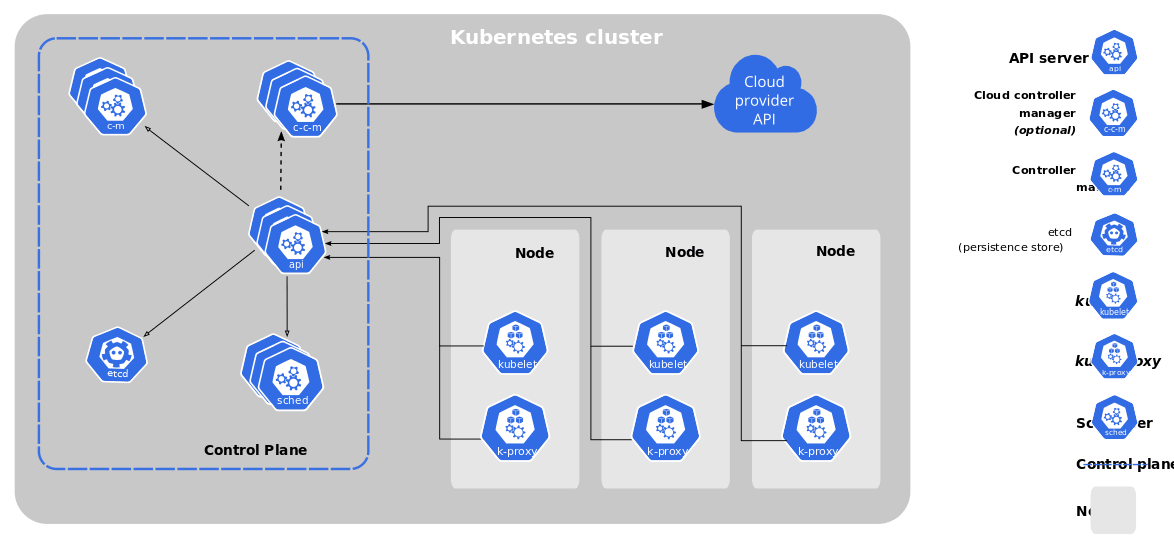
Let's jump on to discuss the elements of the Kubernetes cluster.
Master Node
The master node is one of the cluster's separate nodes that manage the cluster's other nodes and is responsible for orchestrating containers on the worker nodes. There can be more than one master node in the cluster, and it's recommended to have more than one master node in the production cluster to ensure the availability of the cluster.
ETCD
ETCD is a data store that works as the brain of Kubernetes. It keeps all the information related to master and worker nodes, pods, and other elements in the key-pair form. It keeps track of various resources by holding the two states, the desired states, and the current state.
API Server
The API server act's as a frontend for Kubernetes, the users, management devices, command line interfaces, etc. All these element talks to the API server to interact with the cluster.
Scheduler
Scheduler distributes the pods and services across the nodes in a distributed manner.
Controllers
The controller manages the desired state of all the objects in the cluster. If the desired state isn't met, the controller ensures to level the current and desired state by taking the necessary steps.
Container Runtime
It's the underline software that's being used to run the container. Generally, it's docker, but there can also be others like containerd, CRI-O, and Mirantis Container Runtime.
Kubelet
Kubelet is an agent that runs on each node of the cluster. It executes the tasks sent from the Kube API server and reports back to the master. It also monitors the pods running on each node and informs the master in case of any issue.
Till this point, we discussed the theoretical part of Kubernetes, but from here, we will understand each element or object of Kubernetes with hands-on exercises.
Assumptions:
You already have some understanding of Kubernetes
A Kubernetes cluster running on the local or cloud (If you don't have any clusters, you can go DigitalOcean Kubernetes by signing up here. You will get $100 as credit, which is good enough for running a two-node cluster for two months.)
Kubelet is installed on your system(if not then refer to this)
Pods
Pods are the smallest object in the Kubernetes. Whenever we scale the application, Kubernetes increases the number of pods in the cluster. The pods can have more than one container; one can run the application, and the other will run as a sidecar container for logging or monitoring. Both these containers share the same volume and networking. We will discuss multiple-container pods in a dedicated section.
Now let's understand how we can create pods:
You can create a pod redis with the redis image by using this command,
kubectl run redis --image=redis
Check the status running container by this command:
kubectl get pods
One question that should come to mind is that from where we are pulling these images, by default, Kubernetes pulls the images from the Docker Hub.
Now let’s see how we can create a pod by using the YAML manifest. This is the smallest manifest file that you can create for a pod.
apiVersion: v1
kind: Pod
metadata:
  labels:
    run: redis
  name: redis
spec:
  containers:
  - image: redis
    name: redis
Save this as redis-pod.yaml and run this command to create the container.
kubectl apply -f redis-pod.yaml
Now we have our container up and running, let’s see how you can terminate it. Check the name of the pod by running the get command and delete it by using the name of the pod, in our case, it's redis.
kubectl delete redis
Commands to remember
List Containers:
kubectl get pods
List pods with details
kubectl get pods -o wide
Describe Pods
kubectl describe pod pod-name
Create pod definition
kubectl run redis --image=redis -o yaml --dry-run=client > redis-pod.yaml
This will create a file redis-pod.yaml.
Extract definition from existing pod
kubectl get pod pod-name -o yaml > pod-definition.yaml
Edit running pod properties
kubectl edit pod pod-name
Practice Questions:
Create a pod with an image busybox with command and yaml.
Create a pod with two images busybox and Redis.
ReplicaSets
ReplicaSets is a process that ensures multiple running instances of a pod and keeps the number of running pods constant all the time. It also helps us in scaling the number of pods as per requirement.
If any container part of the ReplicaSet goes down, the ReplicaSet brings up the new one as a replacement. It also balances the load on pods and nodes by scaling the application if demand increases.
Creating ReplicaSets
Create a file redis-replicasets.yaml with the following configuration,
apiVersion: apps/v1
kind: ReplicaSet
metadata:
  name: redis-replicaset
spec:
  replicas: 3
  selector:
    matchLabels:
      app: redis-app
  template:
    metadata:
      labels:
        app: redis-app
    spec:
      containers:
      - name: redis
        image: redis
Now apply this by using this command
kubectl apply -f redis-replicasets.yaml
Run this command to check the status of ReplicaSet
kubectl get replicasets
Check the status of pods running in ReplicaSets
kubectl get pods
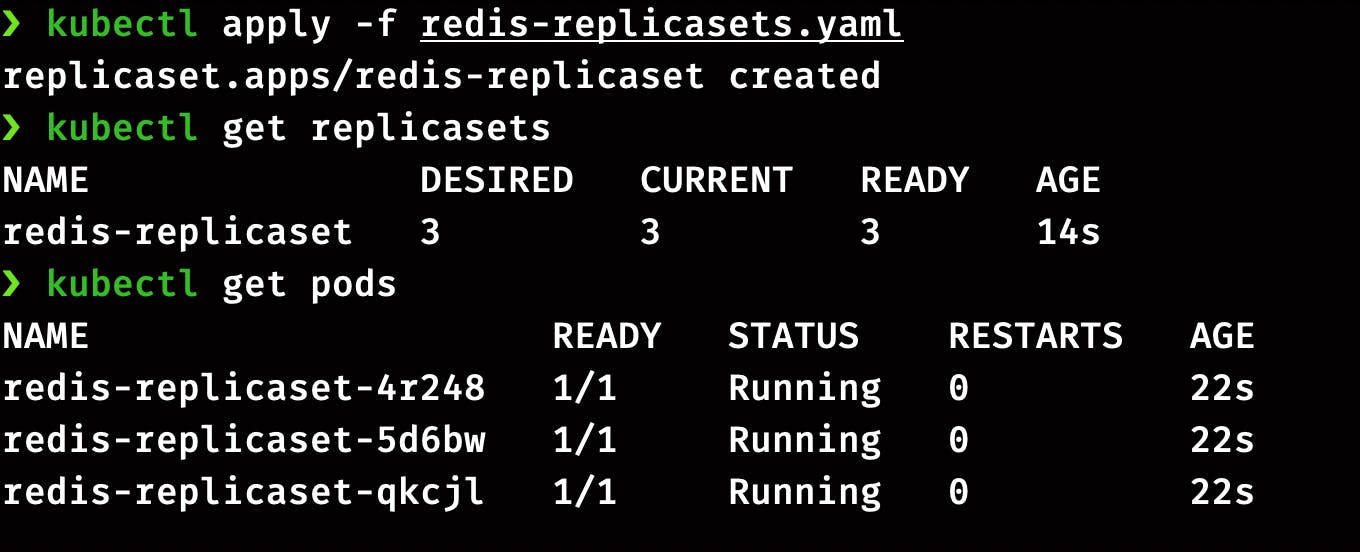
Scaling the ReplicaSets
We can scale the number of pods in ReplicaSets as per the requirement. There are two ways of doing it. Let’s do it the first way by editing the ReplicaSets definition file.
To scale up, we have to edit the value of replicas in manifest file redis-replicasets.yaml from 3 to 5 and run this command
kubectl replace -f redis-replicasets.yaml
It will return, ReplicaSets updated. Now check the status of ReplicaSets and pods.
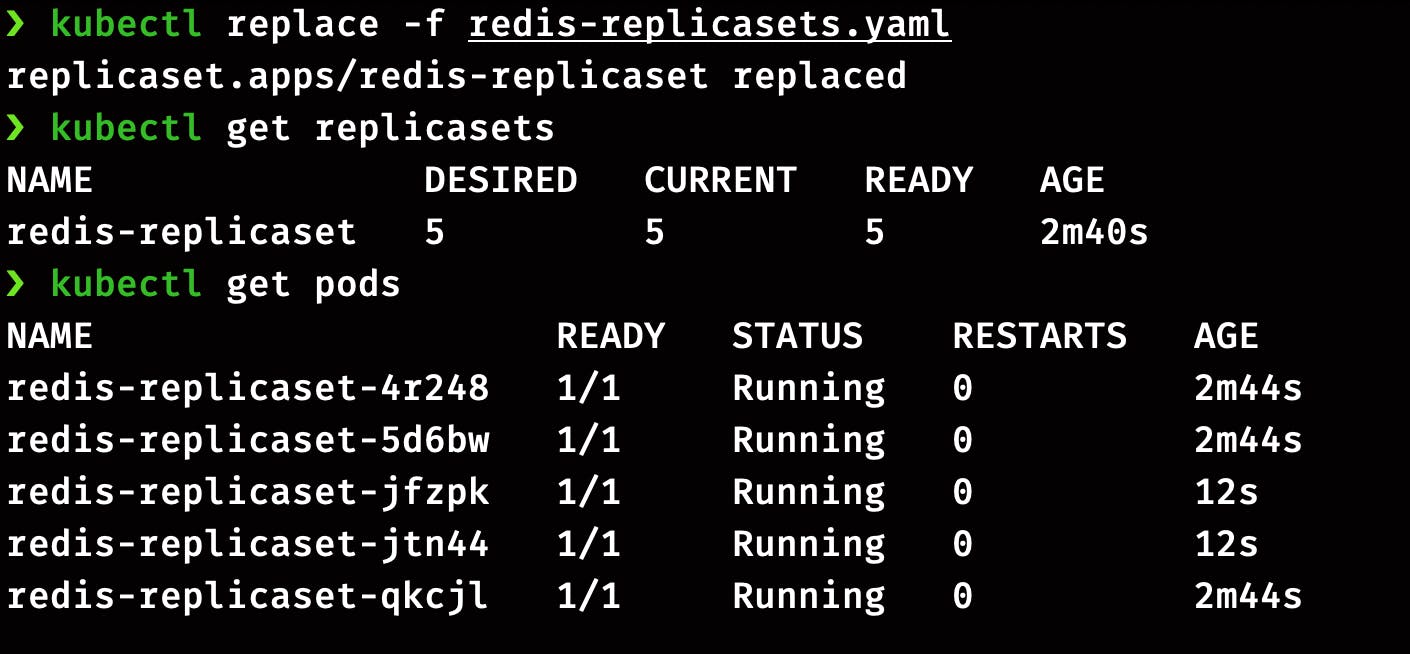
The second way of scaling the ReplicaSets is the imperative command.
kubectl scale --replicas=6 replicaset redis-replicaset
OR
kubectl scale --replicas=6 -f redis-replicasets.yaml
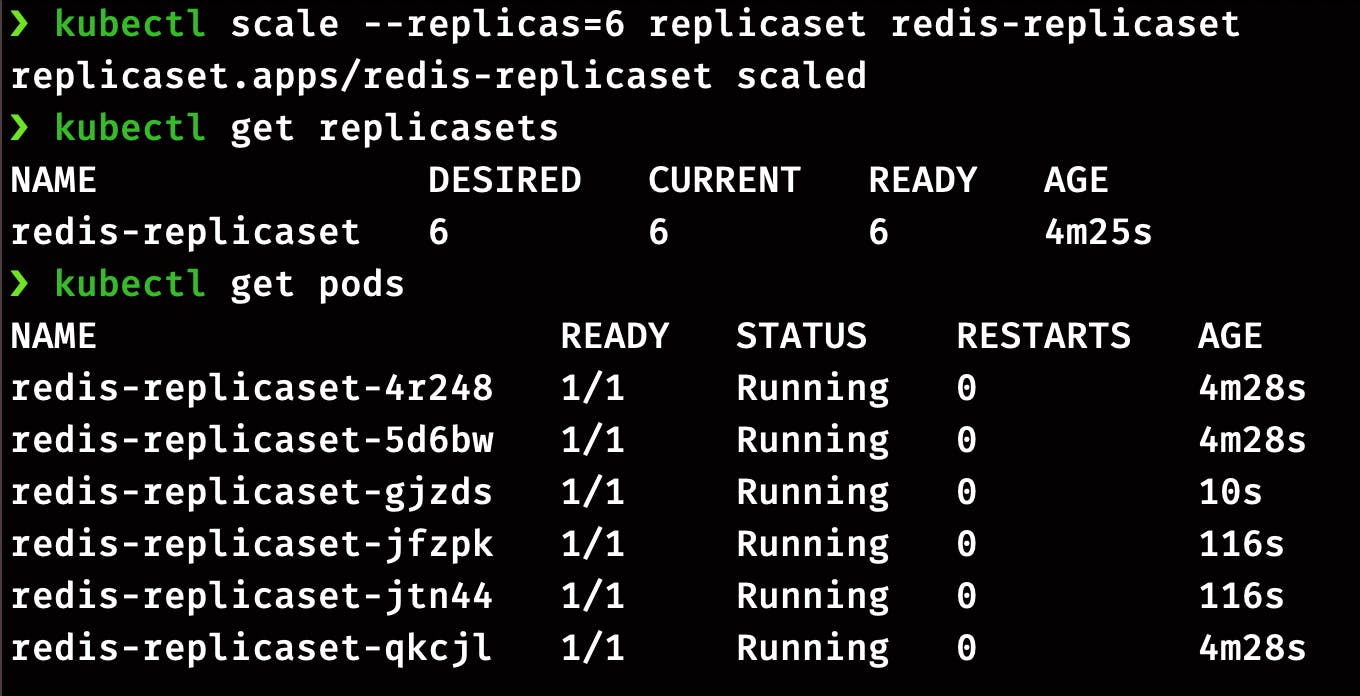
Practice Questions:
Create a ReplicaSet with nginx images and 2 replicas.
Scale it to 3 replicas by editing the definition file.
Scale down to 2 by using the imperative command.
Scale up again to 3 by using the kubectl edit command
Delete the ReplicaSet.
Deployments:
In the previous section, we went through the ReplicaSets, which eases application management in the cluster. Deployments come over replicates in terms of functionalities as they can easily upgrade or downgrade the application without affecting the user experience. Here’s the list of features that comes with Deployments;
Create replicas of the applications
Easy scale and downscale
Rollback to the previous version
Deployment strategy
Creating a Deployment
For our demo, we will create a file redis-deployment.yaml with the following configuration.
apiVersion: apps/v1
kind: Deployment
metadata:
  name: redis-deployment
spec:
  replicas: 3
  strategy:
    type: Recreate
  selector:
    matchLabels:
      app: redis-app
  template:
    metadata:
      labels:
        app: redis-app
    spec:
      containers:
      - name: redis
        image: redis
Before applying this, let's go through some of the basic configurations:
replicas: Deployment will create 4 instances of the Redisstrategy: Deployment will recreate all the pods at once in case of an update. Here we can also go with RollingUpdates
Now create the Deployment with this command
kubectl apply -f redis-deployment.yaml
Check the status of deployment and pods
kubectl get deployments
kubectl get pods
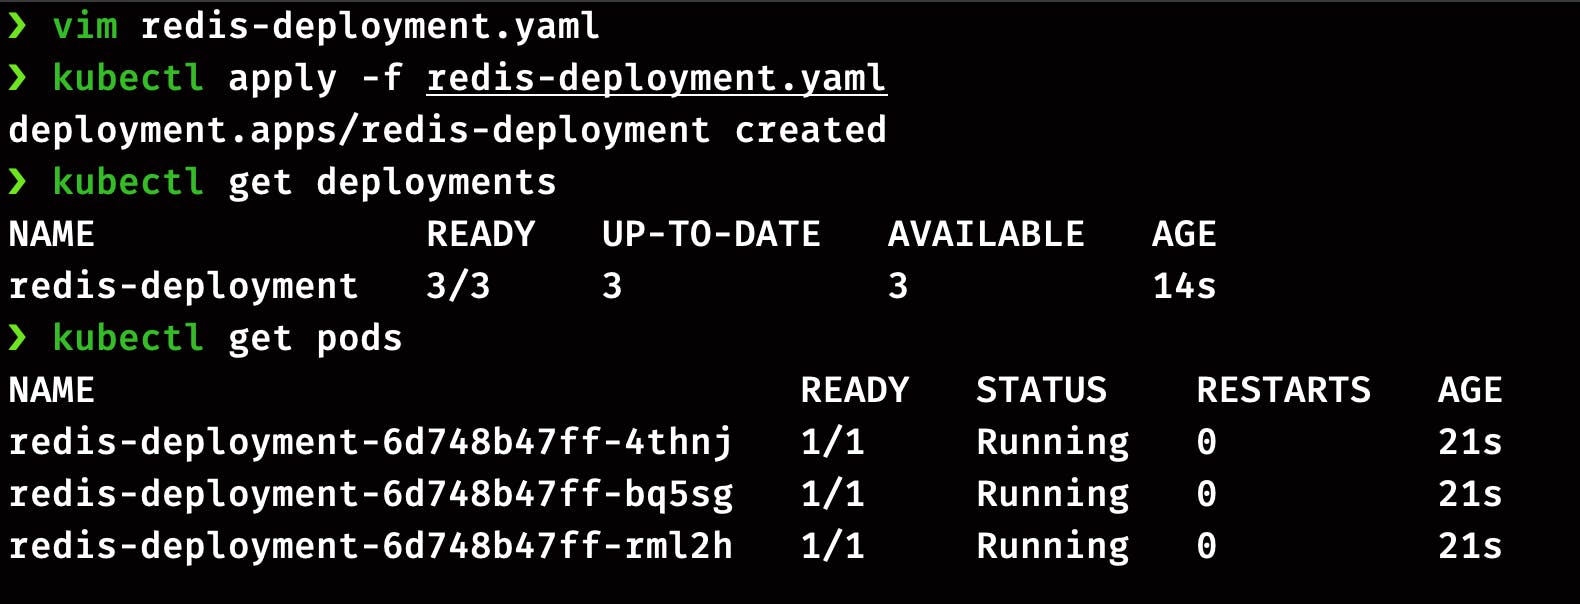
Now let’s play around with the deployment by changing its configuration. There are two methods of doing it, first by editing the definition file redis-deployment.yaml, and the second is by using the imperative command.
Method 1: Let's do it first by directly editing the manifest YAML file. Open the file by running the command below and change the image version from redis to redis:7.0. Save the file and exit the terminal.
kubectl edit deployment redis-deployment
Now run this command to verify the image version
kubectl get pods
kubectl describe deployment redis-deployment | grep Image
You can see the entire output of the command by removing the grep Image command, but if you are looking for the Image version, this command will save your time.

Method 2: We can directly pass the image version in the imperative command. By this command, we are changing the version of the Redis image from redis:7.0 to redis:6.2.
kubectl set image deployment/redis-deployment redis-deployment-container=redis:6.2 --record
Again you can run the same command to check the status of pods and image version in the updated deployment.
kubectl get pods
kubectl describe deployment redis-deployment | grep Image

Now you can delete the deployment by this command,
kubectl delete deployment redis-deployment
Practice Questions:
Create deployment with nginx image, 3 replicas, and recreate strategy.
Update the image to
nginx:1.18by editing the configuration.Update image through CLI to
nginx:1.17Delete the current deployment
Create another deployment through imperative command
Name: redis-deployment
replicas: 3
Image: redis
- Delete the
redis-deployment
Namespaces
A namespace in the Kubernetes is an object that helps in grouping the other Kubernetes object. Namespaces are intended for use in environments with many users spread across multiple teams, or projects.
Characteristics of the namespace:
Provides scope for names
Resources names need to be unique in a namespace but not across all namespaces
Namespaces can’t be nested inside one another
A resource can be part of only one namespace
List Namespaces
You can list the existing namespace in the cluster using:
kubectl get namespaces
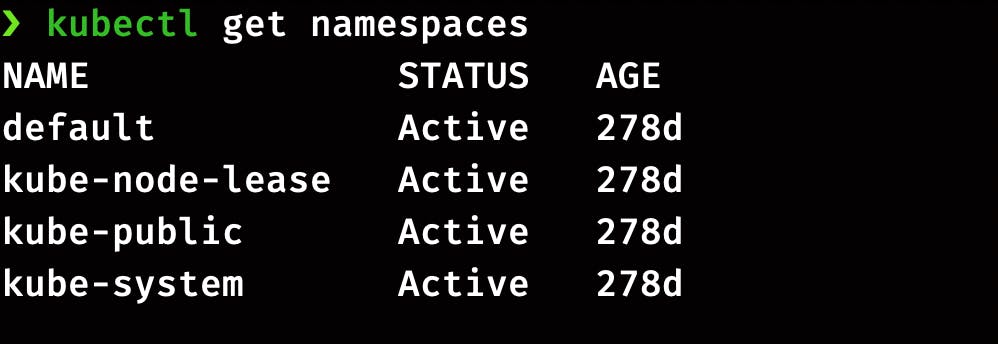
A newly created cluster comes with these 4 default namespaces.
default: The default namespaces is for the objects with no other namespace, so till now, all the objects we have created were part of default namespaces.kube-system: This is the namespace for the objects created by the kubernetes systemkube-public: This namespace host all the publically accessible data like cluster information. This namespace is visible and readable publically throughout the cluster. The user doesn’t need to authenticate to access the objects.kube-node-lease: This namespace holds Lease objects associated with each node. Node leases allow the kubelet to send heartbeats so the control plane can detect node failure.
Creating Namespace
Namespaces can be easily created by using the imperative command,
kubectl create namespace development
Using the Namespace
You can use the namespace flag in the command while creating the object.
kubectl run nginx --image=nginx --namespace=development
Now check the pod's status and namespace.
kubectl get pods --namespace=development

Similarly, you can use the same tag on other objects like Deployments and Replicasets.
Namespaces and DNS
A Kubernetes object can be directly accessed by other objects inside the same namespace. For example, a pod can be accessed by other objects in the namespace by using the name of the attached service. But to access the pod from one namespace to another, we will have to put the name of the namespace in the URL.
Let’s understand this with an example; we have to access a pod in the staging namespace from the dev namespace. The URL will look like this staging-service.staging.svc.cluster.local
So the format of URL will be <service-name>.<namespace-name>.svc.cluster.local
Are all objects part of Namespace..?
No, All objects in Kubernetes are not part of namespaces. The namespace is a kind of object, and it can’t be a part of another namespace. You can check the list of objects that can’t be part of namespaces by this command;
# In a namespace
kubectl api-resources --namespaced=true

# Not in a namespace
kubectl api-resources --namespaced=false
That's all for this part, and In the next part, we will cover topics like Secrets, Security Contexts, ConfigMaps, etc.
To be continued...
