

CKAD exam Preparation Notes - Labels, Selectors & Annotations, Jobs and CronJobs - Part 5


Table of contents
In the last part, we have covered the Readiness Probes, Liveness Probes, and basic Logging. This part will cover Labels, Selectors and Annotations, Jobs, and CronJobs in Kubernetes.
Labels
Labels are the key-value pair metadata attached to Kubernetes objects, such as pods.
Labels can be attached to any object to identify the attributes of the objects that are meaningful and relevant to users.
Unlike other metadata, labels don't change the objects functionality, implying no semantics for the object.
Labels can also be changed and removed as per the requirement.
Labels are always in key-value pairs, where the key will be unique for a given object.
One of the most common uses of labels to put on pods is to specify the release version, like alpha or beta.
Adding labels while creating the objects
apiVersion: v1
kind: Pod
metadata:
  labels:
    run: earth
    type: planet
  name: earth
spec:
  containers:
    image: busybox
    name: earth
    resources: {}
  dnsPolicy: ClusterFirst
  restartPolicy: Always
status: {}
Adding labels to existing resources
kubectl label pod/moon type=satellite
Removing the labels
kubectl label pod/moon type-
You can also edit the labels by using the kubectl edit command.
Selectors
Selectors allow us to filter the objects based on labels attached to them.
Selectors are very useful while grouping the resources for services or other resources.
For example, the service determines its association with a pod based on the label of that pod.
Types of Selectors
Equality-based: Equality-based requirements allow filtering by label keys and values. The matching objects should match the exact values of all the label constraints.
Set-based: Set works similarly to the Equality based, but it requires matching only one value if you have provided multiple selector values.
Here we are creating a deployment mars-deployment where pod mars has a label planet: mars. There's also a service curiosity with a selector that matches the label we specified in pod mars.
---
apiVersion: apps/v1
kind: Deployment
metadata:
  labels:
    planet: mars
  name: mars-deployment
spec:
  replicas: 1
  selector:
    matchLabels:
      planet: mars
  strategy: {}
  template:
    metadata:
      labels:
        planet: mars
    spec:
      containers:
      - image: nginx
        name: mars
        ports:
        - containerPort: 80
        resources: {}
status: {}

---
apiVersion: v1
kind: Service
metadata:
  labels:
    app: curiosity
  name: curiosity
spec:
  ports:
  - name: http
    port: 80
    protocol: TCP
    targetPort: 80
  selector:
    planet: mars
status:
  loadBalancer: {}
Annotations
Annotations are another type of metadata in Kubernetes.
You can use annotations to attach arbitrary non-identifying metadata to objects.
Clients such as tools and libraries can retrieve this metadata.
Annotations can't be used to identify or select objects.
Some use cases of Annotations
Build, release, or image information like timestamps, release IDs, git branch, PR numbers, image hashes, and registry address.
Pointers to logging, monitoring, analytics, or audit repositories.
User or tool/system provenance information
Name and contact details of the maintainer
Example:
apiVersion: v1
kind: Pod
metadata:
  name: moon
  annotations:
    imageregistry: "https://hub.docker.com/"
    maintainer: Jake
spec:
  containers:
  - name: nginx
    image: nginx
    ports:
    - containerPort: 80
You can add annotations during the creation of an object or add to an existing object by annotate command.
kubectl annotate pod/moon a8r.io/description="satellite of earth"
You can also remove the annotation by this command
kubectl annotate pod/moon a8r.io/description-
And you can also add or remove the annotations by using the kubectl edit command.
Jobs
Some kinds of tasks like image processing or reporting run for a shorter period and terminate after completing the task.
These workloads are meant to live for a shorter time.
In such scenarios, we use Job to run the given task and terminate after the task completion.
Kubernetes jobs can create multiple pods to complete the task.
restartPolicy of Job always set to Never.
Let's take a look at an example Job. Here I'm taking the example from KodeKloud's CKAD course. In this example, we are running a Job with an image random-error that randomly fails to run.
apiVersion: batch/v1
kind: Job
metadata:
  labels:
    run: random-error-job
  name: random-error-job
spec:
  completions: 3
  parallelism: 3
  backoffLimit: 20
  activeDeadlineSeconds: 300
  template:
    spec:
      containers:
      - image: kodekloud/random-error
        name: random-error-job
        resources: {}
      restartPolicy: Never
In the screenshot below, you can see that the Job ran 11 times to complete the task.
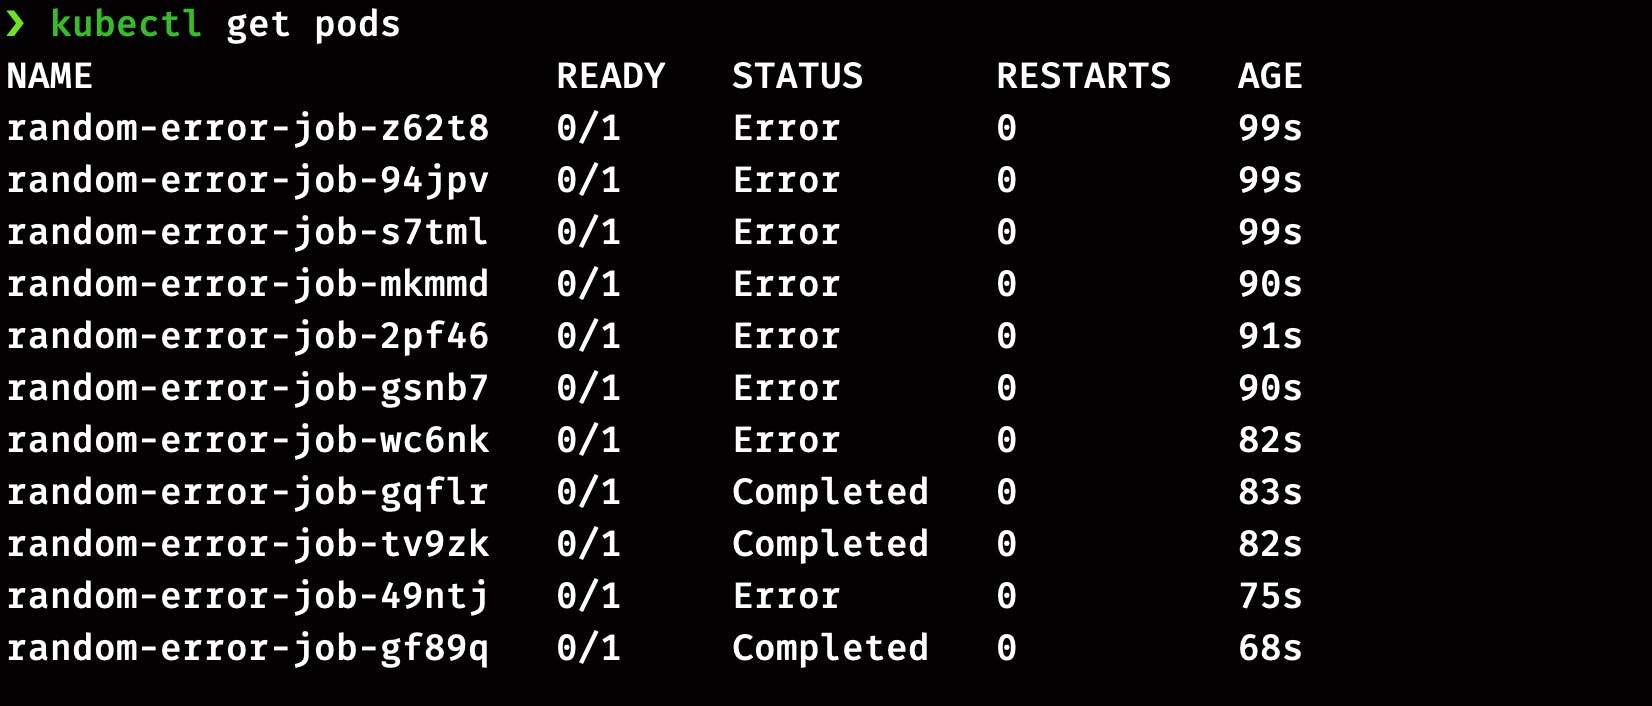
The above examples look similar to a pod specification with some extra fields.
completions: The number of times the Job has to complete before termination.parallelism: The number of simultaneous pods runs to complete the Job.backoffLimit: The number of unsuccessful attempts before the Job will automatically terminate without waiting to reach the completions.activeDeadlineSeconds: TheactiveDeadlineSecondsapplies to the duration of the Job, no matter how many Pods are created. Once a Job reachesactiveDeadlineSeconds, all of its running Pods are terminated and the Job status will become type: Failed with reason:DeadlineExceeded
CronJobs
CronJobs are similar to the cronjob that we run on Linux systems.
It can be used when you have to send a report or check the status at a particular time.
CronJob tasks should be configured to recur indefinitely (for example: once a day/week/month); you can define the point in time within that interval when the Job should start.
Here's the example CronJob that prints the date, and this is a test cronjob message every minute.
apiVersion: batch/v1
kind: CronJob
metadata:
  name: test-cronjob
spec:
  schedule: "* * * * *"
  jobTemplate:
    spec:
      template:
        spec:
          containers:
          - name: test-cronjob
            image: busybox
            imagePullPolicy: IfNotPresent
            command:
            - /bin/sh
            - -c
            - date; echo this is a test cronjob
          restartPolicy: OnFailure
If you are struggling with setting up the schedule, refer to this site crontab.guru.
Practice Questions
Create deployment
venuswithnginximage and labeltype: planet. Now create a servicecassinifor the deployment. Create another pod and check if you can access the Nginx default page over the service IP.Create a job that sleeps for 30 seconds and print
hello, this is a test, three times.Convert the above job into a CronJob and run it every 6 hours.
That's all for this part, and In the next part, we will cover topics like Labels, Selectors and Annotations, Jobs and CronJobs, etc.

To be continued..!!